[Tutorial] How to Port(Host) .np domian on Google Blogger?
Do you want your .np domain to get ported in Google Blogger? If yes then this tutorial may be helpful to you. Okay what are the advantages of porting .np with Google blogger? Some of you may have these questions. I will try to explain all these on simple and descriptive way.
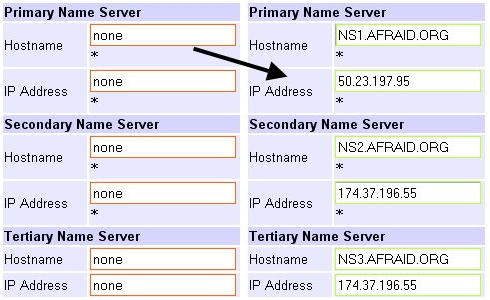
Step1: Log-in to you domain control panel and change the name server as listed below
IP Address: 50.23.197.95Secondary Name Server: NS2.AFRAID.ORG
IP Address: 174.37.196.55
Tertiary Name Server: NS3.AFRAID.ORG
IP Address: 72.20.15.62
Note: This dns server belongs to Afraid.Org which is free DNS service provider and reliable too.
Step 2: Now visit freedns.afraid.org and click on Sign Up! and fill the form. Activate your account with the link mailed on your email account. So describing Afraid.Org( I will abbreviate it as AO) it is the free DNS hosting let you fully manage your own domain. It is very very simple to use and work quite well. Once you are done then you are ready to start.
Step 3: On you AO account click on "Domains" on the left sidebar. You will find "Add Domain" on the page somewhere. This is the place where you are going to add your domain to work. So click on "Add Domain" and you will be redirected to their domain manager.
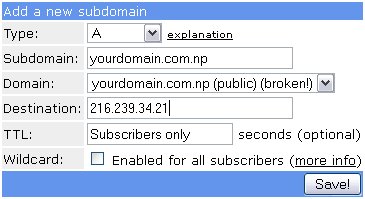
Step 6: Now on the "Subdomains" page click on the [ add ] link to add remaining A name and CNAME records. Let me help you for one and you can do the remaining repeated process. I am going to show you one of the A record addition. So it is A record type is again going to be A on the Type field. For the subdomain field type enter your registered .np domain like the one yourdomain.com.np is used in this tutorial. For Domain field it should be the same registered .np domain. On the destination you must enter the another IP value "216.239.34.21". Previously we used "216.239.32.21" while editing the sub-domain and now it "216.239.34.21". Hope you are not confused. TTL stands for Time To Live which is not mandatory to fill but if you like to then you can make it to 1D which is one day. I prefer not to use it because it allocate the default value if left unchanged. We are not going to use any Wildcard here so leave it unchecked. Now Save the form.
Similarly you can add other A and CNAME records with these values
Type: A
Subdomain: yourdomain.com.np
Destination: 216.239.36.21
Type: A
Subdomain: yourdomain.com.np
Destination: 216.239.38.21
Type: CNAME
Subdomain: www
Domain: yourdomain.com.np
Destination: ghs.google.com
Hope you have made it successfully. If yes then working with AO is over. Now we are moving to Blogger to make this final setup.
Step 7: Open the Google Blogger site. Sign in with your Google account or you can Sign up new here. On the blogger dashboard you will find the New Blog button on the left side bar. Click it and a popup appears on your screen. See on the screenshot below.
Fill the form with Title and Address. When you see the blue square box with Right tick on it, that means the blog address is available else try with some other address. Select the Template available on the pane(You can change it later). Finally click on the Create Blog button to make it your own.
Step 8: When you are into the Blogger Home click on the More options button next to your blog title and go to the Settings option.
On the Setting page you will find the Publishing options where your Blog Address appears. Below that you will find "+ Add a custom domain" . Click it!
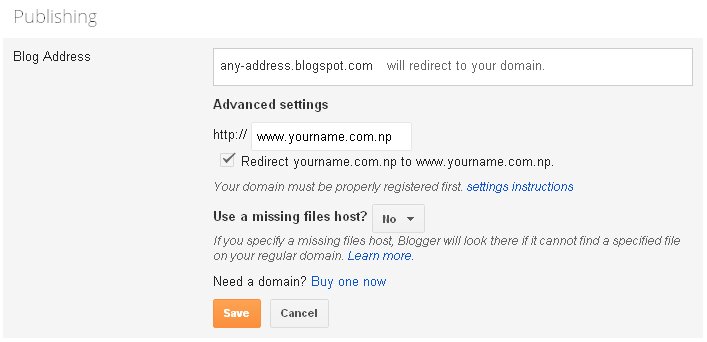
Step 9: Now you are about to complete the process. After clicking "+ Add a custom domain" message says if you want to buy a domain for your blog. Below that you can see "Already own a domain? Switch to advanced settings". Click on "Switch to advanced settings" . On the "Advanced setting" enter your registered .np domain like "www.yourname.com.np". Don't forget to prefix www before your domain name and Save the form.
Step 10: Click on the "New post" button to start blogging. That is it.